Upload File
The Upload File field type automates local file selection and file uploads through web forms. It seamlessly handles native file dialogs across modern web platforms, including Google Forms, Microsoft Forms, government and banking portals, and custom web applications.
Install Helper Program
Due to browser security sandboxes, browser extensions cannot directly interact with OS-level file dialogs without native messaging. The Helper Program is a lightweight local utility required to automatically select and upload files from your local file system.
IMPORTANT
The Helper Program must be installed and running on your computer for automated file selection and uploads to work.
Verifying Helper Program Connection
In the field configuration sidebar, check the connection status banner:
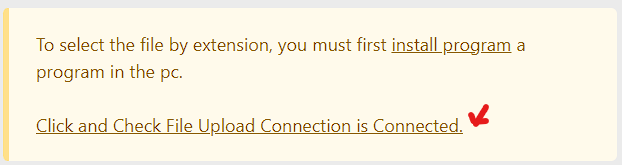
Click "Click and Check File Upload Connection is Connected" to verify active communication between the extension and the local helper program.
Field Options
The Upload File field provides granular controls for single, multiple, and batch folder uploads:
| Option | Description | Required |
|---|---|---|
| Set File/Folder Base Path | Specifies a root folder directory where your upload files reside. | No |
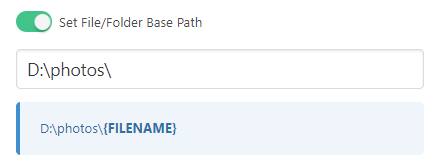
| Base Path | Full directory path to prepend to file names (e.g., D:\photos\). | When Base Path enabled |
| Multiple File Upload | Enables selecting and uploading multiple files in a single operation. | No |
| Separator for Multiple File Upload | Character used to separate multiple file names (e.g., \r\n, ,, ;). | When multiple files enabled |
| Upload all files in a folder | Automatically uploads all files contained inside the specified base folder. | No |
| First check that the file exists in the PC, then select the file | Verifies file existence on disk before attempting to open the dialog. | No |
| Set the uploading browser window title name | Customizes the target OS file dialog title (e.g., "Open" or "Select File"). | No |
| Browser Window Title | Custom title string matching the upload dialog window. | When title customization enabled |
| File Name/Path | Target file name or absolute path from the Excel column or default value. | Yes |
Configuration Details
File Name and File Path Mapping
You can specify target files using either relative file names (combined with a Base Path) or standalone absolute file paths:
Approach A: File Name with Base Path (Recommended)
When all files are stored in a common directory, configure the base path once in field options and specify only the file name in your Excel spreadsheet:
- Base Path:
D:\photos\ - Excel Cell Value:
profile.jpg - Resulting Full Path:
D:\photos\profile.jpg
Approach B: Full Absolute Path
If your files are located across different directories or drives, disable Base Path and provide the full absolute path in your spreadsheet:
- Base Path: Disabled
- Excel Cell Value:
C:\Users\Username\Documents\contract.pdf
NOTE
Predefined variables such as {$predefine_variable$} and dynamic path templates can be used within the File Name/Path field.
Set File/Folder Base Path
- Purpose: Defines the parent directory where upload assets are stored.
- Format:
- Windows:
D:\Documents\Uploads\orC:\Data\Photos\ - macOS / Linux:
/Users/username/uploads/
- Windows:
Multiple File Upload
Allows uploading multiple files into a multi-file file input in one automated step:
- Supported Separators:
- Line break (
\r\n/\n) - Comma (
,) - Semicolon (
;)
- Line break (
TIP
File paths containing spaces can be enclosed in double quotes:
"C:\Uploads\Document 2025.pdf"
"C:\Uploads\Identity Card.png"
File Existence Check
- Purpose: Checks whether the target file exists on your local storage before triggering the OS file dialog.
- Benefit: Prevents the automation from hanging on broken dialogs or attempting to open non-existent files.
- Recommendation: Keep this option enabled for resilient unattended automation.
Browser Window Title Customization
- Purpose: Specifies the exact window title of the native file selection dialog.
- Default Value:
"Open"(standard Windows file dialog title). - Use Cases: Useful when uploading via non-English operating systems, web applications with customized dialog titles (e.g. "Select an image to upload"), or when multiple dialogs are open simultaneously.
Handling Empty Excel Field Values
In real-world data entry, certain rows in your spreadsheet may not contain a file to upload. By default, the extension might still trigger the upload sequence, which can cause timeout warnings on blank rows.
Skip Action for Empty Values
To gracefully bypass the upload field when no file name is provided in the active spreadsheet row:
- In the field configuration, enable "Skip field action if given field value matches" (or use field condition matching).
- Set the matching value pattern to
''(two single quotes representing an empty string). - Execution Behavior: If the row cell is empty, the upload step is skipped entirely and automation proceeds directly to the next field.
Configuration Example
Field Options Setup:
- Set File/Folder Base Path:
D:\Documents\Uploads\ - Skip field action if given field value matches:
''
Execution Flow:
| Row | Spreadsheet Value | Execution Result |
|---|---|---|
| 1 | document.pdf | Uploads D:\Documents\Uploads\document.pdf |
| 2 | (empty) | Skips upload action smoothly |
| 3 | photo.jpg | Uploads D:\Documents\Uploads\photo.jpg |
| 4 | (empty) | Skips upload action smoothly |
Common Upload Workflows
Workflow 1: Standard Single File Upload
- Enable Set File/Folder Base Path and specify your documents folder.
- Enable First check that the file exists in the PC.
- Keep the default window title
"Open". - In your
.xlsxspreadsheet, populate the file names (e.g.,receipt_101.pdf).
Workflow 2: Multi-File Batch Submission
- Enable Multiple File Upload.
- Set the delimiter separator (e.g., newline
\r\nor comma,). - Provide the list of file paths separated by the chosen delimiter in the Excel cell.
Workflow 3: Upload All Files in a Folder
- Enable Upload all files in a folder.
- Specify the target folder path in the Base Path configuration.
- The helper program reads all files in the folder and submits them collectively to the input.
Troubleshooting
Common Issues & Solutions
| Issue | Likely Cause | Solution |
|---|---|---|
| Helper Program not detected | Program not running or blocked by firewall/antivirus | Ensure the Helper Program is running in your system tray. Check permissions and click "Check File Upload Connection". |
| File not found error | Incorrect base path or missing file extension | Verify the directory path exists and includes the trailing slash (D:\folder\). Ensure the file extension matches the actual file on disk. |
| Wrong dialog window selected | Multiple file dialogs open or non-standard title | Close extraneous dialog windows. Enter the exact title in Browser Window Title matching your OS dialog. |
| Upload hangs on blank rows | Empty cell processed without skip condition | Configure Skip field action if given field value matches with '' to bypass rows without files. |
Debug Checklist
- Verify Helper Status: Confirm the helper program icon is visible in the Windows taskbar system tray.
- Validate Path Manually: Copy the full path and paste it into Windows File Explorer to verify accessibility.
- Check Execution Logs: Open Logs to inspect the exact resolved file path sent to the helper program.
Online Interactive Examples
Test and verify your upload configuration against our official interactive practice forms:
- Example-15: Single File Upload - Practice single file selection and base path mapping.
- Example-25: Multiple File Upload - Practice multiple file uploads with separators.


