Site
A Site is the top-level container in Excellent Data Filler representing a web application or domain where you want to automate workflows. It acts as the central hub grouping together all related Site Forms, Segments, Excel Data Templates, Scraper Results, and Site Settings.
Overview
Sites serve as the foundational root of your automation projects:
- Project Organization: Keeps forms, fields, and routines grouped under a dedicated domain profile.
- Centralized Control: Manage site-wide environment variables, column mappings, and backup configurations in one location.
- Multi-Page Coordination: Link multiple sequential forms and segments together using the unique Site ID.
Site Management Dashboard
The site management interface provides a dashboard of all registered sites:

Each site card displays its title, description, active status toggle, and quick-action buttons to access forms, settings, and templates.
Insert Site (Auto vs. Manual Mode)
Excellent Data Filler provides two primary workflows for registering and configuring websites: Auto Mode (instant automated DOM scanning) and Manual Mode (granular step-by-step custom creation).
Overview Comparison
| Feature | Auto Mode (Right-Click Context Menu) | Manual Mode (Step-by-Step Custom Setup) |
|---|---|---|
| Primary Action | Right-click form → Insert Site (Alt + Shift + S) | Dashboard → Insert a new Site (+) |
| Site Container | Created automatically using current page URL | Created manually with custom title and description |
| Form Page Setup | Automatically generated with matched page URL | Configured manually with custom URL pattern & delays |
| Field Detection | Automatically scans DOM tree for all form inputs | Configured manually field-by-field with chosen field types |
| Element Inspection | Automatic selector generation | Uses Inspect Elements and copy context helpers |
| Best For | Standard web forms, rapid bulk onboarding, full-form filling | Complex single-page apps, selective field filling, custom field types |
Method 1: Auto Mode (Context Menu & Keyboard Shortcut)
Auto Mode is the quickest way to register a site. It extracts page metadata and scans all form inputs across the page automatically in seconds.
Step-by-Step Instructions
- Navigate to the Target Web Page: Open the target website containing the form in your browser.
- Trigger Site Registration:
- Right-click anywhere inside the form area on the page and select Insert Site, or
- Press the keyboard shortcut: Alt + Shift + S.
- Automatic Scanning & Configuration:
- The extension automatically creates the root Site container.
- A Site Form is generated and mapped to the target page URL.
- The extension traverses the DOM tree to locate all inputs, textareas, dropdowns, checkboxes, and radio buttons.
- Selectors, field types, names, and initial default values are automatically configured and saved into the extension.
- Review Configuration: Open the extension dashboard to review the generated fields, adjust default values, or map fields to Excel (
.xlsx) columns.
Right-Click Protected Pages
If a web page blocks right-clicking, ensure Allow Right Click? is turned ON in  Extension Settings, or use the keyboard shortcut Alt + Shift + S.
Method 2: Manual Mode (Step-by-Step Custom Setup)
Manual Mode provides granular control over site containers, URL patterns, execution delays, and custom field types.
Step 1: Create the Site Container
- Open the extension popup and navigate to the Sites dashboard.
- Click the Insert a new Site button (
+). - Fill in the site details:
- Site Title: A descriptive name identifying the project (e.g.,
Customer Registration Portal). - Site Description: Optional notes explaining the automation goal.
- Active Status: Enable or disable execution for this site.
- Site Title: A descriptive name identifying the project (e.g.,
- Click Save to create the site container.
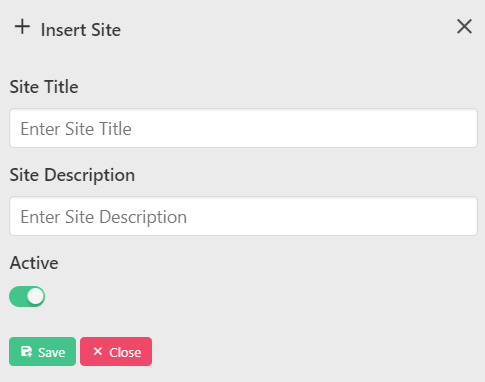
| Field | Required | Description |
|---|---|---|
| Site Title | Yes | Descriptive project name (up to 100 characters). |
| Site Description | No | Optional notes explaining the automation goal. |
| Active Status | Yes | Toggle switch to activate or pause the site. |
Step 2: Add a Site Form Page
- Inside your newly created site, open the Site Form Pages tab.
- Click Insert Form (or press Alt + Shift + F while on the target page).
- Specify the form parameters:
- Page URL: Enter the target form URL (e.g.,
https://example.com/apply). - URL Match Type: Choose Full URL, Pathname, Hostname, or RegEx.
- Delays: Configure Delay Before Running (e.g.,
500 ms) to allow dynamic components to render.
- Page URL: Enter the target form URL (e.g.,
- Click Save to create the form.
Step 3: Add Individual Form Fields
- Open the form's Form Fields tab and click Insert Field (
+). - Select the specific Field Type required for that input:
- Standard:
Text,Select,Radio,Checkbox,Textarea - Advanced:
Date Picker,Upload File,Button,JavaScript Code,CKEditor,Send Request
- Standard:
- Enter the Target Element Selector (CSS selector or XPath).
- Assign the field value, dynamic variable, or Excel column header.
- Save the field and repeat for any remaining inputs you wish to automate.
Context Menu Helpers for Manual Setup
While configuring fields in Manual Mode, you do not need to inspect page source code manually. Excellent Data Filler provides integrated context menu helpers directly on the target web page ( Context Menu Guide):
Interactive Element Inspection
- Inspect Elements (Alt + Shift + I):
- Right-click any element on the page and select Inspect Elements.
- Opens the interactive element inspection modal to test selectors, inspect element attributes, examine bounding boxes, and confirm selector uniqueness in real time.
Selector & Path Copy Helpers
Right-click any target form input to copy its exact identifier directly to your clipboard:
- Copy Element Selector Address (Alt + Shift + C):
- Copies the optimized CSS selector for the selected element.
- Paste directly into the field's Target Element Selector input.
- Copy Element XPath Selector Address (Alt + Shift + X):
- Copies the XPath expression of the right-clicked element.
- Recommended for elements with dynamic IDs or deeply nested structures.
Value & Text Helpers
- Copy text of selected element (Alt + Shift + T):
- Copies the visible text content of the element (ideal for string matching rules or assertions).
- Copy html of selected element (Alt + Shift + H):
- Copies the outer HTML markup of the selected element.
Dropdown Select Helpers
When dealing with <select> dropdowns:
- Copy name of selected option (Alt + Shift + N):
- Copies the visible display text of a dropdown option.
- Copy value of selected option (Alt + Shift + M):
- Copies the underlying
valueattribute of a dropdown option.
- Copies the underlying
- Download select box options:
- Downloads all available options within the dropdown for reference or spreadsheet mapping.
Field Reusability & Responses
- Copy Field (Alt + C):
- Copies an entire field configuration to duplicate or reuse across multiple forms.
- Copy Form Response (Alt + Shift + R):
- Captures element text, selector, XPath, and URL to quickly construct success or error response rules.
Workflow Recommendation
Use Auto Mode initially to capture all basic inputs on the page, then switch to Manual Mode techniques (using Inspect Elements and copy context helpers) to fine-tune complex selectors, add conditional delays, or configure custom field types like Date Picker and Upload File.
Site Management Controls
Each site entry in the dashboard provides management actions:
Site Title & Description
- Site Title: Identifies the project across extension views and export files.
- Site Description: Provides context for team members or future reference.
Active / Inactive Toggle
- Status Toggle: Quickly enable or pause automation for the entire site without deleting any forms, fields, or templates.
Edit Site
- Opens the site workspace, containing tabs for:
- Site Pages (Forms): Manage target URLs and page-level automation.
- Segments: Build on-demand, reusable field routines.
- Excel Template: Download/upload
.xlsxbatch data and sync Google Sheets. - Site Settings: Toggle execution flags, define site environment variables, and export backup files.
- Scraper Data: Inspect and export extracted page data.
Duplicate Site
- Creates an instant clone of the site, including all configured forms, segments, fields, and timing rules. Useful for staging vs. production environments.
Copy Site ID
- Copies the unique internal alphanumeric ID for this site to your clipboard.
- Use Case: When browsing to subsequent pages of a multi-step form, press Alt + Shift + F (or select Insert Form from the context menu) and paste the Site ID to link the new page to this site.
Delete Site
- Permanently removes the site container and all associated forms, segments, and field configurations.
- Recommendation: Export a site backup via Site Settings before performing permanent deletions.
Troubleshooting
Site Not Created from Context Menu
- Extension Disabled: Verify that the extension is toggled ON in the browser toolbar.
- Restricted Pages: Browser extensions cannot execute on internal pages (such as
chrome://oredge://) or web store listings. - Right-Click Blocked: If the page prevents context menus via JavaScript, use the shortcut Alt + Shift + S or enable Allow Right Click? in Settings.
- Diagnostics: Check the built-in Logs dashboard for execution details.
Next Steps
- Site Settings — Configure execution toggles, site environment variables, and exports
 Insert Site Form — Add form pages and URL matching rules
 Segments — Build on-demand, reusable field routines
 Form Fields Configuration — Set up individual form field selectors
 Excel Template Management — Download and upload
 .xlsxspreadsheets