Form Field
Form fields define how elements on web pages are discovered, validated, and populated with data. Each field belongs to a specific Form Page (or Segment) and can retrieve values from an Excel spreadsheet (.xlsx), default static text, dynamic variables, or predefined functions.
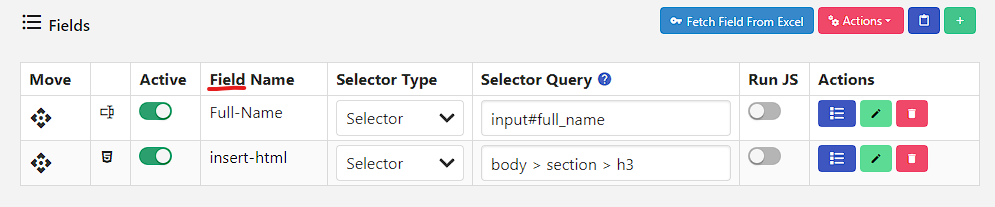
Insert Field
To add a new form field to your site automation:
- Open your site configuration and select the target Form Page (or Segment).
- Click the Insert Field button (
+icon) above the fields table. - Provide the required field parameters:
- Field Name: Unique identifier matching your Excel column or variable.
- Field Type: Automation handler type (e.g. Text, Select, Checkbox, Click).
- Field Selector Type: Locator method (Selector, Id, or XPath).
- Field Selector Query: Unique DOM address of the target element.
- Click Save to register the field.
Tip: You can quickly duplicate any existing field using the row actions menu or by pressing the keyboard shortcut Alt + C to copy field configuration.
Field Options
Essential field configuration options required for automated form filling:
| Field Options | Required | Description | Example Values |
|---|---|---|---|
| Field Name | Yes | Unique identifier for the field and matching Excel header | firstName, email, phone |
| Field Type | Yes | Type of form field for data handling | Text, Number, Date, Select |
| Field Selector Type | Yes | Method for locating the field element | Selector, Id, XPath |
| Field Selector Query | Yes | Unique query address to locate the element | #firstName, input[name="email"], //input |
| Field Value | Yes | Data source: default value or Excel column value | John Doe, [email protected], 1234567890 |
| Active/Inactive | Yes | Enable or disable field processing | Active, Inactive |
| Delay Time Before Running This Field | No | Wait time before field execution (milliseconds) | 0, 500, 1000 |
| Delay Time After Running This Field | No | Wait time after field execution (milliseconds) | 0, 500, 1000 |
| Advanced Field Settings | No | Granular field options (typing tutor, clearing value, etc.) | Custom mappings, events, overrides |
| Field Response Action | No | Conditional logic based on success or failure of the field | Run segment, skip fields, stop |
Field Name
The Field Name serves as the unique identifier for the field within the current site form and defines the corresponding column header in your Excel template (.xlsx).
Important Guidelines:
- Field names must be unique within each site form.
- Names will appear exactly as entered in the Excel
.xlsxtemplate. - Use clean, descriptive names for easy identification:
firstName,lastName,emailAddress. - Avoid unnecessary special characters and spaces (unless dynamically generated).
Dynamic Field Names with Variables
You can embed Variables within the Field Name to create dynamic identifiers during batch processing or table loops:
- Syntax:
field-{{loop.index[loop]}} - Generated field names:
field-1,field-2,field-3, etc.
Field Type
The Field Type determines how the extension interacts with the target DOM element, formats input data, and handles events.
Common Types:
- Text: Standard text and textarea inputs.
- Number: Numeric inputs with formatting validation.
- Date / Date Picker: Calendar pickers and structured date strings.
- Select / Dropdown: Native
<select>elements and custom dropdown libraries. - Checkbox / Radio: Single or multi-choice options.
- File Upload: Native and custom file upload handlers.
- Browser Actions: Tab manipulation, URL opening, alerts, and navigation.
- Scraper Data: Extracting page text, tables, and attributes into Excel.
For the complete catalog of 50+ supported field types, see the Type of Field Reference.
Field Selector Type
The Field Selector Type defines the query syntax used to locate the target DOM element on the web page:
| Selector Type | Description | Best Use Case | Example |
|---|---|---|---|
| Selector | CSS selector query | Most common and flexible locator | input[name="email"], .form-group > input |
| Id | HTML id attribute | Fastest, unique element targeting | #firstName, submit-btn |
| XPath | XML Path expression | Complex traversing, text matching, and hierarchies | //input[@type='text'], //button[contains(text(),'Submit')] |
Field Selector Query
The Field Selector Query is the precise query string used to target the DOM element.
Standard Query Examples
# CSS Selectors
input[name="firstName"]
#email
.form-control

# ID Selectors
#firstName
#email
#phone

# XPath Selectors
//input[@type='text']
//div[@class='form-group']//input
//label[text()='Email']/following-sibling::input
Advanced JavaScript Path Support
You can also write native JS Path expressions starting with $.:
$.document.querySelector("#container");
$.document.querySelector("#container").parentNode;
$.document.querySelector("#container").shadowRoot.querySelector("#full_name");
Random Element Targeting
To select elements dynamically from a list of matching nodes, you can combine selector queries with random integer variables:
input:nth-child({{random.integer[1][3]}})The variable {{random.integer[1][3]}} generates a random integer between 1 and 3, selecting a random sibling element on each iteration.
How to Obtain Field Selector Queries
There are four convenient ways to capture element selectors:
1. Extension Context Menu (Fastest)
Right-click directly on the form element on the web page:
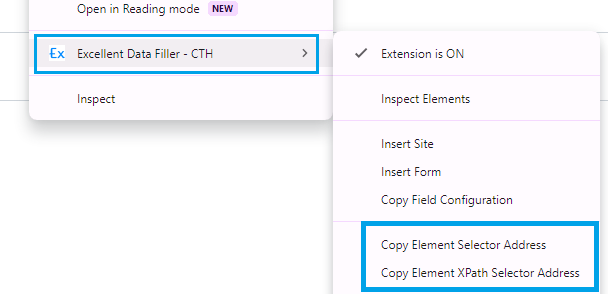
- Choose Copy Element Selector (Alt + Shift + C) for CSS selectors.
- Choose Copy Element XPath (Alt + Shift + X) for XPath queries.
- Paste directly into the Field Selector Query input.
2. Inspect Elements Tool
Press Alt + Shift + I to launch the built-in Inspect Elements. Hover over any element on the page to view its live bounding box, tag, attributes, and generated CSS/XPath selectors.
3. Browser Developer Tools
- Right-click the element and select Inspect.
- In the Elements panel, right-click the highlighted DOM node.
- Select Copy ➔ Copy selector or Copy XPath.
4. Locate Element Guide
For advanced locator techniques, negation rules ([not(@attribute)]), and shadow DOM traversals, review the Locate Element guide.
Field Value
The Field Value specifies the data to be entered into the element.
Value Sources:
- Excel Column Value: If an Excel (
.xlsx) file is uploaded, the extension looks for a column header that matches the Field Name and inserts the corresponding row value. - Field Default Value: Configured under field settings. Serves as a fallback if the Excel cell is empty, or as static data when automating without a spreadsheet.
- Variables: Dynamic values using the Variables engine (e.g.
{{datetime.now}},{{random.number[100][999]}}).
Fallback Priority
If a field is mapped to an Excel column but the row cell is blank, the extension automatically falls back to the configured Field Default Value (unless disabled in Site Settings).
Active / Inactive
Controls whether the field is executed during the automation run:
- Active: The field runs in its sequential order during form execution and is included in the Excel template.
- Inactive: The field is skipped during automation and excluded from generated Excel templates.
Field Timing Configuration
Field-level timing delays help manage slow-loading inputs, animation transitions, or asynchronous validation:
| Setting | Description | Example Values |
|---|---|---|
| Delay Time Before Running This Field | Pause duration before locating and populating the element | 0, 300, 1000 (milliseconds) |
| Delay Time After Running This Field | Pause duration after populating the element before advancing to the next field | 0, 500, 1500 (milliseconds) |
Dynamic Random Delays
To simulate human pauses and bypass bot-detection timing patterns, use a random integer variable in the delay fields:
{{random.integer[500][1500]}}This instructs the extension to wait a randomized duration between 500ms and 1500ms on each run.